Ljubaphoto/Getty Images
Although some people who take running seriously like to keep things as light as possible and only bring the absolute essentials with them on their workouts, some may not have the desire to leave their smartphones at home. Not only is it a useful communication tool — especially in emergencies — but you can listen to audio while running or take photos or videos of your route. You can also use it to track your workout in real time using a running app if you don’t have a smartwatch available.
If you have an iPhone and like having it while racking up the miles, there are iPhone accessories you can get for running that make it easier to access the gadget hands-free. It’s also worth exploring the many functions built into the Apple device that can make using it a hassle-free experience during your workout.
Below is a roundup of some of the most useful iPhone features you should use for your next run.
Turn off Tap to Wake to keep the iPhone from turning on

Claudia Ayuso Ramirez/Getty Images
For people who like listening to audiobooks or music on their iPhones while running, it can be infuriating to have the current track accidentally skip ahead or stop entirely while in the zone. If you keep your device in a snug running belt or pocket, you’ve likely had to stop, pull out your iPhone, and restart the audio, only to have it glitch again once you start running.
What’s probably happening is that the fabric is rubbing against the iPhone’s display in its confined space, causing it to wake up and creating a ruckus with whatever app or notification is onscreen. Apart from affecting audio playback, you may be inadvertently opening apps, initiating a butt dial, or, even worse, an emergency call.
To fix this, look into an iPhone accessibility feature called Tap to Wake — supported on the iPhone XR and newer models — and turn it off during your run. Here’s how:
- Launch the Settings app.
- Go to Accessibility.
- Under Physical and Motor, select Touch.
- Turn the toggle off next to Tap to Wake (it could appear as Swipe to Wake on an older version of iOS).
Once this feature is turned off, your iPhone’s screen will become unresponsive no matter how often it gets tapped or rubbed in your bag or pocket. To access something on your iPhone, press the side button and unlock your device. After your workout, you can follow the same steps and switch the toggle back to the on position.
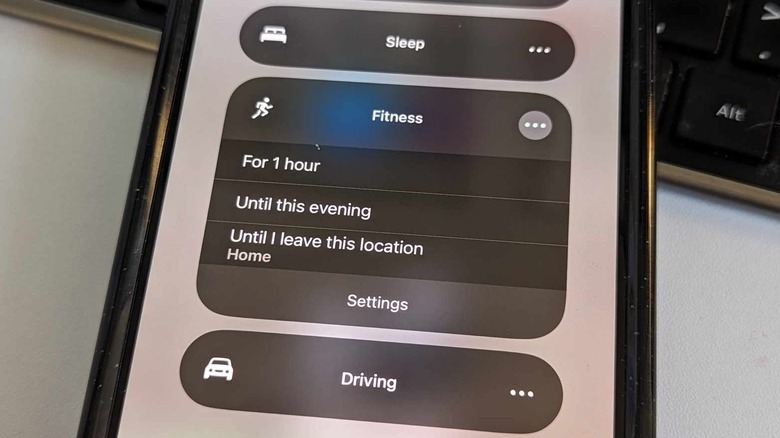
Set up a Focus mode to limit distractions
Jam Kotenko/SlashGear
As the name implies, an iPhone Focus mode allows you to set up a Do Not Disturb profile for different activity types so you can hunker down and keep your mind honed in on the task at hand. You can silence notifications sent by certain apps or people and even customize what your iPhone home and lock screens look like so distractions are temporarily curbed.
You can personalize a Focus mode and enable it while on a run. For starters:
- Launch the Settings app.
- Go to Focus.
- Select Fitness. If you don’t see Fitness in the list, click the + symbol at the top right to access it.
- Click Customize Focus and go through every section to add contacts and apps whose notifications you want to allow or silence.
Apart from controlling incoming notifications, you can add filters that control certain iPhone functions while the Focus is turned on, as well as set a schedule for when you want the Fitness Focus mode to kick on. You can enable it automatically at a specific timeframe, location, or when a running app is open. Alternatively, you can always manually switch it on when you need to by swiping down from the top-right edge of your iPhone screen to open Control Center, tapping on the Focus icon, and choosing Fitness. Tap the three-dot icon next to it for additional duration options or to access its settings.
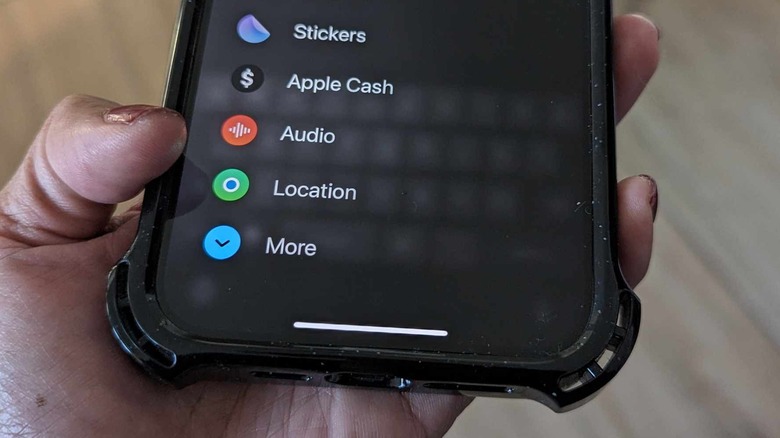
Use the Find My app to share your location
Jam Kotenko/SlashGear
Whether you’re going for a quick jog or participating in a race, it’s always a good idea to share your location on your iPhone. It’s a safety precaution in case you get injured or lost during your workout and need emergency assistance.
Every iPhone is equipped with the Find My app, which lets you share your whereabouts with fellow Apple users. The service is also integrated with the Messages app — Apple’s text messaging platform — so you can easily have someone follow your running route by texting. Both methods use Apple Maps to pinpoint your coordinates and will continually broadcast your location until your specified duration elapses or you manually stop sharing.
Although Apple makes it more seamless to share locations with fellow iPhone, iPad, or Mac users, it’s also possible to tell someone with an Android device where you are currently using the Find My app and Apple Maps. You can open a text thread, hit the + symbol to launch the expandable menu, and select Location to send them a dropped pin in Apple Maps. They’ll receive an Apple Maps link that they can open on their Android phone’s mobile browser. Do note that an Apple Maps pin marks a fixed point — they won’t be able to track you on the go, but they can figure out how to get to where you are as long as you stay put. If you need an Android user to monitor you on a map while you run, consider using Google Maps instead.
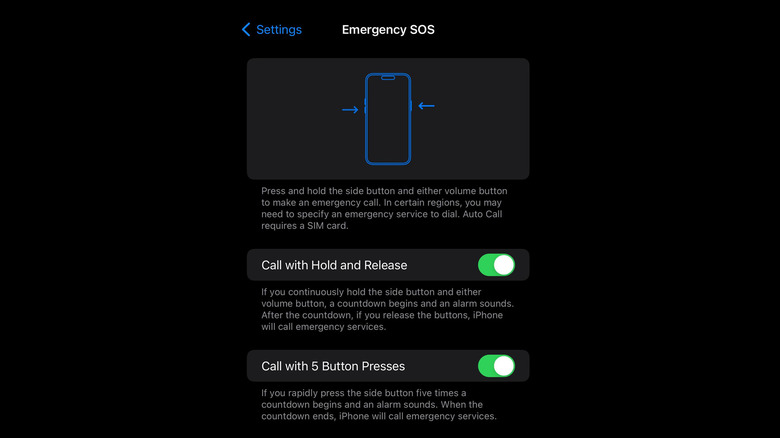
Enable additional settings for Emergency SOS
Jam Kotenko/SlashGear
Running in high-traffic areas can be dangerous and accidents are more likely to happen when you don’t have heightened situational awareness. In case you find yourself in need of assistance due to a serious injury while out on a run, you can make a call to emergency services by long-pressing both the iPhone’s side button and one of the volume buttons and swiping on the SOS toggle on the power-off screen.
Alternatively, you can also set up additional gestures that will achieve the same task without needing to access the power-off screen. To unlock these switches, you’ll have to set up your iPhone for emergencies before your run, starting with the following:
- Launch the Settings app.
- Go to Emergency SOS.
- Enable all the options on this screen, namely:
- Call with Hold and Release: This lets you hold the side button and a volume button continuously until a countdown and alarm are initiated. Once the countdown runs out, you can release the buttons, and the emergency call will be placed.
- Call with 5 Button Presses: You can quickly press the side button five times to trigger a countdown and alarm. The emergency call should go through after the countdown elapses.
Enabling these two options gives you additional methods for reaching out to first responders in case your ability to fully access your iPhone screen is impeded.
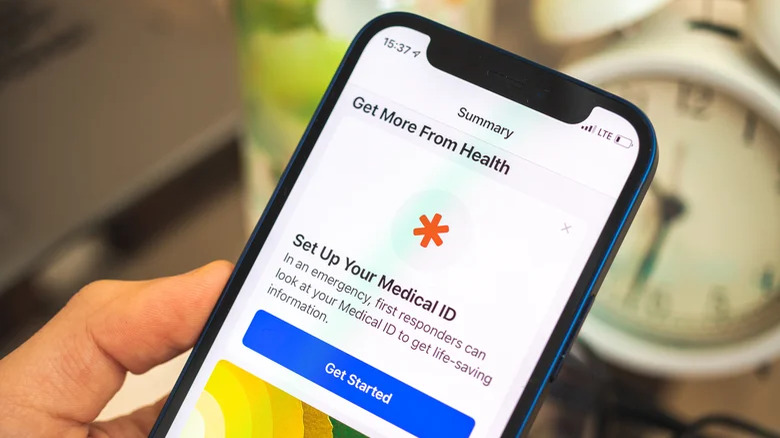
Set up Medical ID and add emergency contacts through the Health app
FellowNeko/Shutterstock
To make sure that people who need to know pertinent information about you in the event of an emergency, you need to fully set up your Medical ID within the Health app on your iPhone. This page will contain your name, date of birth, medical conditions, allergies, medications, blood type, and organ donor status, among other details. This is also where you can add emergency contacts who will receive a message that includes your current location when you use your iPhone’s Emergency SOS feature. Here’s how to get to it:
- Launch the Health app.
- Tap Summary in the bottom navigation bar.
- Tap your profile photo in the top-right corner.
- Select Medical ID.
- Tap Get Started or Edit.
At this point, make sure you fill in all the pertinent information. Add at least three emergency contacts, preferably those within driving distance. Finally, enable the Show When Locked and Share During Emergency Call switches so that first responders on the scene can view your Medical ID, and then tap Done in the top-right corner of the page to save everything.
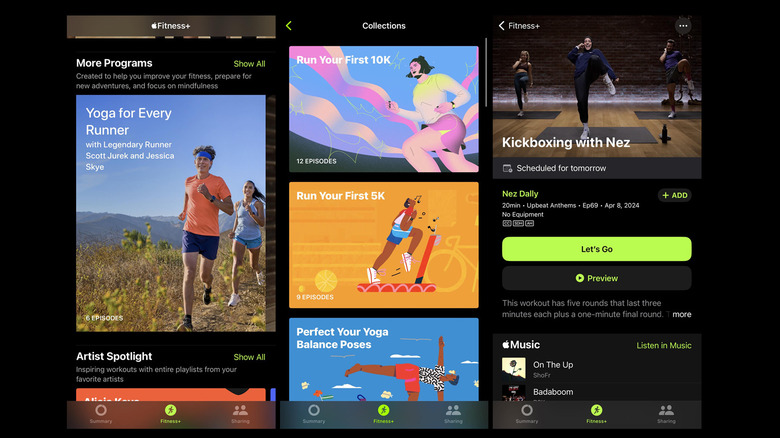
Build a well-rounded training plan with Apple Fitness+
Jam Kotenko/SlashGear
As a runner, you may want to cross-train and include other types of workouts in your exercise regimen to improve your aerobic ability, increase your endurance, and potentially decrease your risk for injury.
Through the Apple Fitness+ app, you can access a wide variety of workout types, such as yoga, HIIT, pilates, dance, strength, and meditation. There’s a wide-ranging catalog of workout videos you can view in 4K Ultra HD quality — you can search by sport or even browse the many collections geared toward runners.
One Apple Fitness+ feature you should look into is the option to build a personalized plan. You can pick which days you want to work out — ideally on days you don’t have any runs scheduled — how many minutes per day you’re willing to move, and the length of time you want to commit to a program. You can pick different activity types you think would help your running — strength, yoga, core, and pilates are good examples. Once you have everything set up, the app will generate a calendar of workout videos for you to follow along to on your iPhone, other Apple device, or on a smart TV via AirPlay.
Every new iPhone owner is afforded a free three-month subscription to Apple Fitness+, followed by a $9.99 per month or $79.99 per year membership fee to continue past the trial period. If you’ve had an iPhone for a while but have yet to sign up for the service, you get one month free as a new subscriber before you start getting charged.